Further to my post on how to customise the locale in Ubuntu and my suggestion to use the following format:
xx_YY.CHARSET@extra
as a way to provide customised locale settings without replacing the system's.
Unfortunately, Ubuntu Thunderbird (ver 17.0.6) cannot handle the above mentioned convention even though Ubuntu can comfortably handling this.
By way of experimentation, I have discovered that it appears that Thunderbird picks up the local specifier in the LC_* environment variables and drops the part from @ onward and then using that as the locale specifier to load the locale settings.
So for example if you customise say English (Hong Kong) and name the customisation where you change the time/date format as en_HK@test and then you select this in your Regional Formats. When Thunderbird loads up, it will pick up the specifier en_HK.utf-8@test but it will only use en_HK.utf8 to load up the appropriate locale settings thus ignoring your customisation.
Hence if you want to correct the locale for Thunderbird, the only way is to replace the system file.
Friday, June 7, 2013
Way to customise Ubuntu locale settings
What started me on the journey to examine how to modify or customise the locale settings in Ubuntu began with a very trivial matter. I moved my Windows Thunderbird to Ubuntu Thunderbird.
Although the regional settings for my Ubuntu is already set to English (Australia), en_AU for those familiar with locale language, the time is still showing in 24 hours format. In Windows, the default is in 12 hours format and it is customarily in Australia to use the 12 hours format. I don't know how Ubuntu has got that wrong!
Hence the quest to correct this which turns out to be a major exercise diving into the bowel of Linux's way of dealing with locale wasting me several days for something we could do in seconds in Windows. At this point, I fully sympathise with Miguel De Icaza of his reason to move over to Mac OS.
There are no shortage of rants on the Internet about how primitive Linux/Ubuntu in catering for this not unusual customisation with some GUI support. Even if none, at least it should be better documented so that user can follow the steps. Unfortunately, the Internet is also fully of advices which range from working in some situations, or brute force work around, to some simply does not work any more.
This post is not to add more rant to an already heapful but to outline the steps one needs to go through to customise and here are the steps:
In Ubuntu and other Linux, the locale formatting specification is based on the C-Library's strptime() specification. The same list of format specifiers can be found in the man page of date.
The specification for the locale is then stored in text format as locale definition file and one for each locale. They can be found in /usr/share/i18n/locales and the binary version is then recorded in an archive somewhere else.
So the first step to do that is locate the locale definition file in this directory. It is also a good practice to store your customised version here too.
You can also use the same command without any parameter to view the current locale settings. We will come back to how they are specified in which file.
I assume that you are familiar with the syntax in the locale definition file. If not, you can study the precise definition here.
Identify the items you want to customise and as a good house keeping task make sure you change the file's:
xx_YY@extra
where xx is the ISO-639 language code and YY is the ISO-3166 country code. The @extra is the bit that allows you to identify your customisation. Normally @extra is not used. When you compile the locale definition file, that is the next step, you then specify the character set used in definition in the following convention:
xx_YY.CHARSET@extra
where the CHARSET can be UTF-8, ISO-8859-1 or ASCII.
In my case all I want to do is to display time in 12 hours format and hence I modified the t_fmt and d_t_fmt as follows:
To compile my customisation and to install it into the locale archive, I use the following command (assuming your current directory is in /usr/share/i18n/locales, the directory containing your modified definition file):
If you are replacing the system deployed file with your customised version, use the following variation:
To verify your changes have been successfully installed into the locale archive, you can use the above mentioned locale command. This is where it will save you time if you have followed the above mentioned house keeping recommendations as your modified title/version/date are become evident.
If you are replacing the system deployed file with your customised version, all you have to do is to log out of your session and log back in.
You can use locale -ck LC_TIME (or whatever setting you have changed) to see if your customisation are compiled correctly.
All you then have to do is to select that (as circled in red). Close the dialog and log out and log in to bring that into use.
What actually happens behind the scene is that it modifies or creates the ~/.pam_environment file that records the locale settings meeting your selection. This file is not there unless you have change the Regional Formats. In my case the LC_TIME becomes:
LC_TIME=en_AU.UTF-8@mod
If you want to apply your change to the system, you simply modified the /etc/default/locale file.
Although the regional settings for my Ubuntu is already set to English (Australia), en_AU for those familiar with locale language, the time is still showing in 24 hours format. In Windows, the default is in 12 hours format and it is customarily in Australia to use the 12 hours format. I don't know how Ubuntu has got that wrong!
Hence the quest to correct this which turns out to be a major exercise diving into the bowel of Linux's way of dealing with locale wasting me several days for something we could do in seconds in Windows. At this point, I fully sympathise with Miguel De Icaza of his reason to move over to Mac OS.
There are no shortage of rants on the Internet about how primitive Linux/Ubuntu in catering for this not unusual customisation with some GUI support. Even if none, at least it should be better documented so that user can follow the steps. Unfortunately, the Internet is also fully of advices which range from working in some situations, or brute force work around, to some simply does not work any more.
This post is not to add more rant to an already heapful but to outline the steps one needs to go through to customise and here are the steps:
Step 1 - Identify the locale definition file you want to modify
If you are unfamiliar with way Ubuntu specifies locale information, you can visit this page.In Ubuntu and other Linux, the locale formatting specification is based on the C-Library's strptime() specification. The same list of format specifiers can be found in the man page of date.
The specification for the locale is then stored in text format as locale definition file and one for each locale. They can be found in /usr/share/i18n/locales and the binary version is then recorded in an archive somewhere else.
So the first step to do that is locate the locale definition file in this directory. It is also a good practice to store your customised version here too.
Step 2 - Customise the setting(s)
Before you modify the settings, you can use the following command to view the format of items, for say the time/date display, of your locale:locale -ck LC_TIME
You can also use the same command without any parameter to view the current locale settings. We will come back to how they are specified in which file.
I assume that you are familiar with the syntax in the locale definition file. If not, you can study the precise definition here.
Identify the items you want to customise and as a good house keeping task make sure you change the file's:
- Title to reflect that you have changed something
- Change the version number, say from 1.0 to 1.05
- Change the date.
Step 2.1 - Decide how to use your change
Before you save the changes into the file, you need to decide what you want to do:- Replace the existing locale with your customised version - this will impact on the system as well as per-user. Simply use the same file name.
- Keep your customised locale separate from the one you based on and you can then choose to apply this system-wide or on per-user basis. You need to save the changes to a different file name.
xx_YY@extra
where xx is the ISO-639 language code and YY is the ISO-3166 country code. The @extra is the bit that allows you to identify your customisation. Normally @extra is not used. When you compile the locale definition file, that is the next step, you then specify the character set used in definition in the following convention:
xx_YY.CHARSET@extra
where the CHARSET can be UTF-8, ISO-8859-1 or ASCII.
In my case all I want to do is to display time in 12 hours format and hence I modified the t_fmt and d_t_fmt as follows:
%
% Change "%T" to "%r"
t_fmt       "<U0025><U0072>"
%

% Change "%T" to "%r"
d_t_fmt     "<U0025><U0061><U0020><U0025><U0064><U0020><U0025><U0062><U0020><U0025><U0059><U0020><U0025><U0072><U0020><U0025><U005A>"
I also want to retain the system deployed setting and introduce my customisation as such. Hence I name my file as en_AU@mod.
Step 3 - Compile the locale definition file into the locale archive
This can be accomplished with the localedef command with super user privilege and the locale archive by default is located in /usr/lib/locale/locale-archive. This is a binary file but whose contents can be listed by using the following command:locale -av
To compile my customisation and to install it into the locale archive, I use the following command (assuming your current directory is in /usr/share/i18n/locales, the directory containing your modified definition file):
sudo localedef -c -v -f UTF-8 -i en_AU@mod en_AU.UTF-8@mod
If you are replacing the system deployed file with your customised version, use the following variation:
sudo localedef -c -v -f UTF-8 --replace -i en_AU en_AU.UTF-8
To verify your changes have been successfully installed into the locale archive, you can use the above mentioned locale command. This is where it will save you time if you have followed the above mentioned house keeping recommendations as your modified title/version/date are become evident.
If you are replacing the system deployed file with your customised version, all you have to do is to log out of your session and log back in.
You can use locale -ck LC_TIME (or whatever setting you have changed) to see if your customisation are compiled correctly.
Step 4 - Introduce your change on per user basis
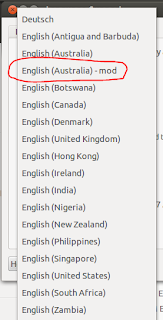
You can select your customised locale definition by using the Ubuntu's Regional Formats in the Language Support applet or fondly known as gnome-language-selector. If you have named your customised definition file appropriately, it will show up in the list like this:
All you then have to do is to select that (as circled in red). Close the dialog and log out and log in to bring that into use.
What actually happens behind the scene is that it modifies or creates the ~/.pam_environment file that records the locale settings meeting your selection. This file is not there unless you have change the Regional Formats. In my case the LC_TIME becomes:
LC_TIME=en_AU.UTF-8@mod
If you want to apply your change to the system, you simply modified the /etc/default/locale file.
Subscribe to:
Posts (Atom)