At the on set, let's me congratulate the developers in Gpg4Usb for releasing a very useful GPG shell that is portable in Windows and portable in a sense in Linux. The same distribution can run in Windows and in Linux, with some caveats as discussed below.
You can download a copy from here and unzipping it into a folder in Windows or Linux and you can immediately use it by running the program start_windows.exe. In Linux, you start the program by launching the start_linux program.
While it cannot do all the stuff that Gpg4Win can do in Windows, the beauty of Gpg4Usb is that it is self-contain and can run off the USB drive in any Windows without Administrative Privilege. It carries a copy of gpg.exe for Windows and gpg for Linux in the bin folder. The keys, using the standard format used by gpg.exe, are kept in the keydb folder.
Since there is no special treatment needed to get this program running in Windows from your local hard drive or your USB drive, let's move the discussion onto running this from Linux.
Through no fault of this program if located on USB drive, the default way of mounting the USB drive in Linux forbids one to execute any binary from such a device. Hence it is not as portable as in a Windows environment where there is no such restriction.
Without root access, the only viable option is to copy the gpg4usb folder onto a local drive (into the home folder if you like) from the USB drive. If you have updated any keys while using this program directly from the USB drive in Windows, all you have to do is just to update the gpg4usb/keydb folder on your local drive. Once you have done that, the following caveats apply:
1) Make sure you change the file permission of the following files to have executable permission:
gpg4usb/start_linux
gpg4usb/bin/gpg
Failure to do so will not launch anything and there is no crash message. If you simply give gpp4usb/start_linux executable permission, in a 32-bit Linux, the program will start but you will not see the keys in the key store. This is because the program fails to launch gpg4usb/bin/gpg necessary to retrieve the keys.
2) In a 64-bit Linux you need to ensure that you have 32-bit binary support. In Debian/Ubuntu derivative distro, such as Mint, you need to use the Software Manager to install the package ia32-libs-multiarch.
Without that package the program will not start even if the Caveat 1) above has been applied. I would recommend to try to run the program after applying the changes mentioned in caveat 1) first just in case some other 32-bit program may have installed the 32-bit support for you.
This program, despite the above caveats in Linux, is a competent replacement of GPA that is not longer supported and even KGpg.
Saturday, August 17, 2013


Friday, June 7, 2013
Caveat to customise Ubuntu locale for Ubuntu Thunderbird
Further to my post on how to customise the locale in Ubuntu and my suggestion to use the following format:
xx_YY.CHARSET@extra
as a way to provide customised locale settings without replacing the system's.
Unfortunately, Ubuntu Thunderbird (ver 17.0.6) cannot handle the above mentioned convention even though Ubuntu can comfortably handling this.
By way of experimentation, I have discovered that it appears that Thunderbird picks up the local specifier in the LC_* environment variables and drops the part from @ onward and then using that as the locale specifier to load the locale settings.
So for example if you customise say English (Hong Kong) and name the customisation where you change the time/date format as en_HK@test and then you select this in your Regional Formats. When Thunderbird loads up, it will pick up the specifier en_HK.utf-8@test but it will only use en_HK.utf8 to load up the appropriate locale settings thus ignoring your customisation.
Hence if you want to correct the locale for Thunderbird, the only way is to replace the system file.
xx_YY.CHARSET@extra
as a way to provide customised locale settings without replacing the system's.
Unfortunately, Ubuntu Thunderbird (ver 17.0.6) cannot handle the above mentioned convention even though Ubuntu can comfortably handling this.
By way of experimentation, I have discovered that it appears that Thunderbird picks up the local specifier in the LC_* environment variables and drops the part from @ onward and then using that as the locale specifier to load the locale settings.
So for example if you customise say English (Hong Kong) and name the customisation where you change the time/date format as en_HK@test and then you select this in your Regional Formats. When Thunderbird loads up, it will pick up the specifier en_HK.utf-8@test but it will only use en_HK.utf8 to load up the appropriate locale settings thus ignoring your customisation.
Hence if you want to correct the locale for Thunderbird, the only way is to replace the system file.
Way to customise Ubuntu locale settings
What started me on the journey to examine how to modify or customise the locale settings in Ubuntu began with a very trivial matter. I moved my Windows Thunderbird to Ubuntu Thunderbird.
Although the regional settings for my Ubuntu is already set to English (Australia), en_AU for those familiar with locale language, the time is still showing in 24 hours format. In Windows, the default is in 12 hours format and it is customarily in Australia to use the 12 hours format. I don't know how Ubuntu has got that wrong!
Hence the quest to correct this which turns out to be a major exercise diving into the bowel of Linux's way of dealing with locale wasting me several days for something we could do in seconds in Windows. At this point, I fully sympathise with Miguel De Icaza of his reason to move over to Mac OS.
There are no shortage of rants on the Internet about how primitive Linux/Ubuntu in catering for this not unusual customisation with some GUI support. Even if none, at least it should be better documented so that user can follow the steps. Unfortunately, the Internet is also fully of advices which range from working in some situations, or brute force work around, to some simply does not work any more.
This post is not to add more rant to an already heapful but to outline the steps one needs to go through to customise and here are the steps:
In Ubuntu and other Linux, the locale formatting specification is based on the C-Library's strptime() specification. The same list of format specifiers can be found in the man page of date.
The specification for the locale is then stored in text format as locale definition file and one for each locale. They can be found in /usr/share/i18n/locales and the binary version is then recorded in an archive somewhere else.
So the first step to do that is locate the locale definition file in this directory. It is also a good practice to store your customised version here too.
You can also use the same command without any parameter to view the current locale settings. We will come back to how they are specified in which file.
I assume that you are familiar with the syntax in the locale definition file. If not, you can study the precise definition here.
Identify the items you want to customise and as a good house keeping task make sure you change the file's:
xx_YY@extra
where xx is the ISO-639 language code and YY is the ISO-3166 country code. The @extra is the bit that allows you to identify your customisation. Normally @extra is not used. When you compile the locale definition file, that is the next step, you then specify the character set used in definition in the following convention:
xx_YY.CHARSET@extra
where the CHARSET can be UTF-8, ISO-8859-1 or ASCII.
In my case all I want to do is to display time in 12 hours format and hence I modified the t_fmt and d_t_fmt as follows:
To compile my customisation and to install it into the locale archive, I use the following command (assuming your current directory is in /usr/share/i18n/locales, the directory containing your modified definition file):
If you are replacing the system deployed file with your customised version, use the following variation:
To verify your changes have been successfully installed into the locale archive, you can use the above mentioned locale command. This is where it will save you time if you have followed the above mentioned house keeping recommendations as your modified title/version/date are become evident.
If you are replacing the system deployed file with your customised version, all you have to do is to log out of your session and log back in.
You can use locale -ck LC_TIME (or whatever setting you have changed) to see if your customisation are compiled correctly.
All you then have to do is to select that (as circled in red). Close the dialog and log out and log in to bring that into use.
What actually happens behind the scene is that it modifies or creates the ~/.pam_environment file that records the locale settings meeting your selection. This file is not there unless you have change the Regional Formats. In my case the LC_TIME becomes:
LC_TIME=en_AU.UTF-8@mod
If you want to apply your change to the system, you simply modified the /etc/default/locale file.
Although the regional settings for my Ubuntu is already set to English (Australia), en_AU for those familiar with locale language, the time is still showing in 24 hours format. In Windows, the default is in 12 hours format and it is customarily in Australia to use the 12 hours format. I don't know how Ubuntu has got that wrong!
Hence the quest to correct this which turns out to be a major exercise diving into the bowel of Linux's way of dealing with locale wasting me several days for something we could do in seconds in Windows. At this point, I fully sympathise with Miguel De Icaza of his reason to move over to Mac OS.
There are no shortage of rants on the Internet about how primitive Linux/Ubuntu in catering for this not unusual customisation with some GUI support. Even if none, at least it should be better documented so that user can follow the steps. Unfortunately, the Internet is also fully of advices which range from working in some situations, or brute force work around, to some simply does not work any more.
This post is not to add more rant to an already heapful but to outline the steps one needs to go through to customise and here are the steps:
Step 1 - Identify the locale definition file you want to modify
If you are unfamiliar with way Ubuntu specifies locale information, you can visit this page.In Ubuntu and other Linux, the locale formatting specification is based on the C-Library's strptime() specification. The same list of format specifiers can be found in the man page of date.
The specification for the locale is then stored in text format as locale definition file and one for each locale. They can be found in /usr/share/i18n/locales and the binary version is then recorded in an archive somewhere else.
So the first step to do that is locate the locale definition file in this directory. It is also a good practice to store your customised version here too.
Step 2 - Customise the setting(s)
Before you modify the settings, you can use the following command to view the format of items, for say the time/date display, of your locale:locale -ck LC_TIME
You can also use the same command without any parameter to view the current locale settings. We will come back to how they are specified in which file.
I assume that you are familiar with the syntax in the locale definition file. If not, you can study the precise definition here.
Identify the items you want to customise and as a good house keeping task make sure you change the file's:
- Title to reflect that you have changed something
- Change the version number, say from 1.0 to 1.05
- Change the date.
Step 2.1 - Decide how to use your change
Before you save the changes into the file, you need to decide what you want to do:- Replace the existing locale with your customised version - this will impact on the system as well as per-user. Simply use the same file name.
- Keep your customised locale separate from the one you based on and you can then choose to apply this system-wide or on per-user basis. You need to save the changes to a different file name.
xx_YY@extra
where xx is the ISO-639 language code and YY is the ISO-3166 country code. The @extra is the bit that allows you to identify your customisation. Normally @extra is not used. When you compile the locale definition file, that is the next step, you then specify the character set used in definition in the following convention:
xx_YY.CHARSET@extra
where the CHARSET can be UTF-8, ISO-8859-1 or ASCII.
In my case all I want to do is to display time in 12 hours format and hence I modified the t_fmt and d_t_fmt as follows:
%
% Change "%T" to "%r"
t_fmt       "<U0025><U0072>"
%

% Change "%T" to "%r"
d_t_fmt     "<U0025><U0061><U0020><U0025><U0064><U0020><U0025><U0062><U0020><U0025><U0059><U0020><U0025><U0072><U0020><U0025><U005A>"
I also want to retain the system deployed setting and introduce my customisation as such. Hence I name my file as en_AU@mod.
Step 3 - Compile the locale definition file into the locale archive
This can be accomplished with the localedef command with super user privilege and the locale archive by default is located in /usr/lib/locale/locale-archive. This is a binary file but whose contents can be listed by using the following command:locale -av
To compile my customisation and to install it into the locale archive, I use the following command (assuming your current directory is in /usr/share/i18n/locales, the directory containing your modified definition file):
sudo localedef -c -v -f UTF-8 -i en_AU@mod en_AU.UTF-8@mod
If you are replacing the system deployed file with your customised version, use the following variation:
sudo localedef -c -v -f UTF-8 --replace -i en_AU en_AU.UTF-8
To verify your changes have been successfully installed into the locale archive, you can use the above mentioned locale command. This is where it will save you time if you have followed the above mentioned house keeping recommendations as your modified title/version/date are become evident.
If you are replacing the system deployed file with your customised version, all you have to do is to log out of your session and log back in.
You can use locale -ck LC_TIME (or whatever setting you have changed) to see if your customisation are compiled correctly.
Step 4 - Introduce your change on per user basis
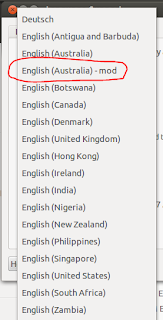
You can select your customised locale definition by using the Ubuntu's Regional Formats in the Language Support applet or fondly known as gnome-language-selector. If you have named your customised definition file appropriately, it will show up in the list like this:
All you then have to do is to select that (as circled in red). Close the dialog and log out and log in to bring that into use.
What actually happens behind the scene is that it modifies or creates the ~/.pam_environment file that records the locale settings meeting your selection. This file is not there unless you have change the Regional Formats. In my case the LC_TIME becomes:
LC_TIME=en_AU.UTF-8@mod
If you want to apply your change to the system, you simply modified the /etc/default/locale file.
Tuesday, May 21, 2013
Android is like the Windows XP days with little regards to user's protection
Months ago, I made a statement to my friends that effectively compared Android's operations or lack of security to the days of Windows XP and prior. The open neglect seems to follow the same excuse Windows use to make it easy for people to use. Now my observation is supported,
The Android threat landscape is starting to resemble that of Windows, according to F-Secure's Mobile Threat Report
The Android threat landscape is growing in both size and complexity with cyber criminals adopting new distribution methods and building Android-focused malware services, according to a report from Finnish security vendor F-Secure.
The number of mobile threats has increased by nearly 50 percent during the first three months of 2013, from 100 to 149 families and variants, F-Secure said in its Mobile Threat Report for Q1 2013 that was released on Tuesday. Over 91 percent of those threats target the Android platform and the rest target Symbian.What frightens me most and at the same annoying me is that when you install most applications, they demand access to your account, your phone, or other facilities that do not seem to be related to what the main function of the applications.
For example, I once wanted to install a PDF viewer and it demanded permission to access my phone contacts, etc. I have yet to see a PDF viewer in Linux/Windows demanding access to my Outlook or Thunderbird phone book, or my Google account. After all, it is just a program to render the PDF document and all it really need is read access to certain area where the document is held.
Then the other date I want to install a GPS logger but it too needed my Google Account, phone Contacts, phone logs, etc. Why? Is it just a program to jolt down the GPS location regular interval or on demand? All it really requires should be write access to the user's area and no more and no less.
If application demanding this kind of unnecessarily access of elevated privilege or to areas in Windows and Linux, they will be exposed as Trojan or Malware. But in Android, a form of Linux, it is an acceptable practice. Why?
As a result, I often do not install those applications that demand unreasonably access.
The only way to fix this rampant neglect of security is to turn everything off and then allowing the user to enable/disable access relating to features user requires. Ultimately it should be the responsibility of the phone owner. At the moment, the big switch is just too wide much like Windows XP where most people were using it without security.
XmlSerialization - why two runtime behaviour for class with read-only properties?
Following on from the previous blog post, and just to recap, there are at least two ways to write a class with read only property.
The old way is:
and the other way is to use private setter like this:
These two classes functionally are the same. However, the XmlSerializer exhibits very different behaviour depending on how you write the class. This to me seem rather odd.
In the case of PersonReadOnly, there is no runtime exception, except that the state of the class, namely Name and Age, are not serialized as in agreement with the specification. So when the stream is deserialized, the values of Name and Age are that of the null and 0, respectively. Fair enough!
But when one writes the class as in the style promoted in PersonReadOnly1, the runtime behaviour is radically different. XmlSerializer throws the following InvalidOperationException, which is caused by the exception in sgen.exe,
The question is: should CLR exhibit the same runtime behaviour regardless of how the class is constructed?
The old way is:
    [ Serializable ]
    public class PersonReadOnly {
        String m_Name;
        Int32 m_Age;
        public String Name {
            get{ return m_Name; }
        }
        public Int32 Age {
            get{ return m_Age; }
        }

        public PersonReadOnly() {
        }

        public PersonReadOnly (String name, Int32 age) {
            this.m_Name = name;
            this.m_Age = age;
        }
    }
and the other way is to use private setter like this:
    [ Serializable ]
    public class PersonReadOnly1 {
        String m_Name;
        Int32 m_Age;
        public String Name {
            get{ return m_Name; }
            private set { m_Name = value; }
        }
        public Int32 Age {
            get{ return m_Age; }
            private set { m_Age = value; }
        }

        public PersonReadOnly1() {
        }

        public PersonReadOnly1 (String name, Int32 age) {
            this.Name = name;
            this.Age = age;
        }
    }
These two classes functionally are the same. However, the XmlSerializer exhibits very different behaviour depending on how you write the class. This to me seem rather odd.
In the case of PersonReadOnly, there is no runtime exception, except that the state of the class, namely Name and Age, are not serialized as in agreement with the specification. So when the stream is deserialized, the values of Name and Age are that of the null and 0, respectively. Fair enough!
But when one writes the class as in the style promoted in PersonReadOnly1, the runtime behaviour is radically different. XmlSerializer throws the following InvalidOperationException, which is caused by the exception in sgen.exe,
System.InvalidOperationException: Unable to generate a temporary class (result=1).
error CS0200: Property or indexer 'TestSerialization.PersonReadOnly1.Name' cannot be assigned to -- it is read only
error CS0200: Property or indexer 'TestSerialization.PersonReadOnly1.Age' cannot be assigned to -- it is read only

   at System.Xml.Serialization.Compiler.Compile(Assembly parent, String ns, XmlSerializerCompilerParameters xmlParameters, Evidence evidence)
   at System.Xml.Serialization.TempAssembly.GenerateAssembly(XmlMapping[] xmlMappings, Type[] types, String defaultNamespace, Evidence evidence, XmlSerializerCompilerParameters parameters, Assembly assembly, Hashtable assemblies)
   at System.Xml.Serialization.XmlSerializer.GenerateTempAssembly(XmlMapping xmlMapping, Type type, String defaultNamespace)
   at System.Xml.Serialization.XmlSerializer..ctor(Type type, String defaultNamespace)
   at System.Xml.Serialization.XmlSerializer..ctor(Type type)
   at TestSerialization.TestXmlSerialization.SerializeClassWithNonPublicSetter_PersonReadOnly1() in E:\Projects\SerializationDemo2\TestSerialization\TestXmlSerialization.cs:line 74
The question is: should CLR exhibit the same runtime behaviour regardless of how the class is constructed?
Saturday, May 11, 2013
XmlSerializer - Difference in runtime behaviour between MS .Net and Mono runtime
There are several ways to define a class in C# with read-only properties.
You could define it like this:
This is the good old way of doing it. When this class is serialized using Xml Serialization, the values of the properties are not serialized.
Alternately, you can declare one with a private setter or using the auto-generated property syntax with private setter, like this:
While WithAutoPropertiesReadOnly and PersonReadOnly classes are functionally the same, the runtime treatments in CLR (MS .Net) and Mono runtime are very different.
CLR and Mono differences
The Mono runtime used in this experiment is version 2.10.8.1 hosted in Ubuntu 12.04 LTS).
When one tries to construct an XmlSerializer object for the class WithAutoPropertiesReadOnly class, like this:
CLR runtime throws an exception of type InvalidOperationException while Mono blissfully serializes and deserializes with XmlSerializer in defiant of the specification.
This is dangerous as it introduces runtime differences that can affect cross-platform compatibility. Irrespective if the above piece of code is run in CLR or Mono, the same runtime behaviour should result.
This anomaly between CLR (runtime 2.0 & 4.0) and Mono only manifested by the presence of non-public property setter. In fact, the exception thrown in CLR is due to the runtime exception thrown by sgen.exe when the runtime tries to generate the temporary serialization DLL.
There is no disagreement when trying to serialize the class PersonReadOnly; both CLR and Mono yield the same result that the values for the properties are not serialized in Xml Serialization.
You could define it like this:
    [ Serializable ]
    public class PersonReadOnly
    {
        String m_Name;
        Int32 m_Age;
        public String Name {
            get{ return m_Name; }
        }
        public Int32 Age {
            get{ return m_Age; }
        }

        public PersonReadOnly()
        {
        }

        public PersonReadOnly (String name, Int32 age)
        {
            this.m_Name = name;
            this.m_Age = age;
        }
    }
This is the good old way of doing it. When this class is serialized using Xml Serialization, the values of the properties are not serialized.
Alternately, you can declare one with a private setter or using the auto-generated property syntax with private setter, like this:
    [ Serializable ]
    public class WithAutoPropertyReadOnly
    {
        public String Name { get; private set; }
        public Int32 Age { get; private set; }

        public WithAutoPropertyReadOnly() { }

        public WithAutoPropertyReadOnly( string name, Int32 age )
        {
            this.Name = name;
            this.Age = age;
        }
    }
The end result of this class WithAutoPropertyReadOnly is to produce private setters for properties Name and Age.While WithAutoPropertiesReadOnly and PersonReadOnly classes are functionally the same, the runtime treatments in CLR (MS .Net) and Mono runtime are very different.
CLR and Mono differences
The Mono runtime used in this experiment is version 2.10.8.1 hosted in Ubuntu 12.04 LTS).
When one tries to construct an XmlSerializer object for the class WithAutoPropertiesReadOnly class, like this:
XmlSerializer ser = new XmlSerializer( typeof(WithAutoPropertiesReadOnly) );
CLR runtime throws an exception of type InvalidOperationException while Mono blissfully serializes and deserializes with XmlSerializer in defiant of the specification.
This is dangerous as it introduces runtime differences that can affect cross-platform compatibility. Irrespective if the above piece of code is run in CLR or Mono, the same runtime behaviour should result.
This anomaly between CLR (runtime 2.0 & 4.0) and Mono only manifested by the presence of non-public property setter. In fact, the exception thrown in CLR is due to the runtime exception thrown by sgen.exe when the runtime tries to generate the temporary serialization DLL.
There is no disagreement when trying to serialize the class PersonReadOnly; both CLR and Mono yield the same result that the values for the properties are not serialized in Xml Serialization.
Tuesday, May 7, 2013
A bug in Jorte Calendar - Always showing am in the Task popup
This is clearly a bug in Jorte Calendar version 1.5.10 running in Android 4.x.
If you create a Task and assign the start or/and end times as somewhere in the pm, in the brief view, shown here, it always shows am:
 Notice the time circled in red.
If one goes ahead and edit this task, the full editing view shows a different story:

The times are clearly defined as in the pm and not in the am. In fact, regardless if one defines the time as am or pm, the brief version dialog box always shows am.
It therefore appears to show that the programmer has failed to parse the times and to choose the am or pm at all! It seems they have left that at the default, which I guess is the am.
While this Calendar app is one of the better ones in the Google Play, its user interface leaves plenty to be desired. For example when defining time, why put the AM/PM selector on the left hand side of the numeral where most others by convention and by standard putting it on the right?
Back to the drawing board and hopefully someone will test it properly and while at it, put the AM/PM selector on the right hand side of the numerals please. Or better still in the locale correct location.
If you create a Task and assign the start or/and end times as somewhere in the pm, in the brief view, shown here, it always shows am:
If one goes ahead and edit this task, the full editing view shows a different story:
The times are clearly defined as in the pm and not in the am. In fact, regardless if one defines the time as am or pm, the brief version dialog box always shows am.
It therefore appears to show that the programmer has failed to parse the times and to choose the am or pm at all! It seems they have left that at the default, which I guess is the am.
While this Calendar app is one of the better ones in the Google Play, its user interface leaves plenty to be desired. For example when defining time, why put the AM/PM selector on the left hand side of the numeral where most others by convention and by standard putting it on the right?
Back to the drawing board and hopefully someone will test it properly and while at it, put the AM/PM selector on the right hand side of the numerals please. Or better still in the locale correct location.
Subscribe to:
Posts (Atom)